|
|
Snowflake
Watching
... In search of the perfect snowflake ... |
|
| If you live in a cold climate, you
can do much more than just look at snowflake pictures. You can experience the real
thing for yourself! It's easy ... and it's fun!.
Snowflake watching also a fine way to introduce your children to a bit
of outdoor science. All it takes is a little magnification, a
little patience, and some interest in observing Nature's art. You
may be amazed by what you find falling out of the sky on a cold winter's
day! |
|
Magnifiers - A Buyer's Guide |
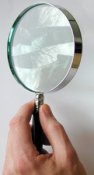  Snowflake watching,
like bird watching, requires some optical gear. The best way to
begin is with an inexpensive magnifier. It doesn't have to be the large
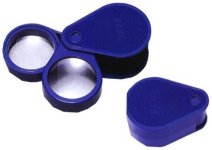
kind you associate with Sherlock Holmes (far right). A smaller,
fold-up magnifier (near right) works very well.
These are available at many drugstores or hardware stores for just a few
dollars (or see below for other sources). Snowflake watching,
like bird watching, requires some optical gear. The best way to
begin is with an inexpensive magnifier. It doesn't have to be the large
kind you associate with Sherlock Holmes (far right). A smaller,
fold-up magnifier (near right) works very well.
These are available at many drugstores or hardware stores for just a few
dollars (or see below for other sources). The best
way to find beautiful snowflakes is to keep a small magnifier in your coat pocket.
Not all snowfalls bring nice crystals, so you have to keep your eyes
open and be patient. Someday - when you're out skiing,
snowmobiling, or just buying groceries - you will look down on your
sleeve and want your magnifier. It only takes a minute to have a
closer look, and it's fun!
If you want to know what
to look for when snowflake watching, check out my online
Guide to Snowflakes. Or, for a handy book that describes the
different types of crystals in more detail, I heartily recommend my
Field Guide to Snowflakes. Finding the different crystal types
is fairly easy once you know what's out there. |
|
Inexpensive Magnifiers
A typical magnifier, as found at your local drugstore
or hardware store, will probably cost about $6, maybe less. A
magnification of 3X is okay, but 5X is better for looking at snowflakes.
A fold-up double-magnifier (pictured above), with two 5X lenses, is a
good choice. A single 5X lens is good for most viewing, and using
both lenses together for 10X is useful for looking at smaller crystals.
In the folded position, the lenses are protected in your coat pocket.
And since it only costs a few dollars, it's no great tragedy if it gets
lost.
If you cannot find what
you want at your local store, try
Indigo Instruments. I recommend model 23202-3, which
has a pair of reasonable quality, glass 5X lenses in a plastic case for
under $3. I usually carry around one of these, and the optical
quality is surprisingly good. You don't have to spend much
money to start snowflake watching.
Jeweler's
Loupes
If you want
better optical quality than you get with an inexpensive magnifier, then
you can move up to a jeweler's loupe. These are also just
magnifiers, but they use better-made optics and give a sharper, clearer
image. They also cost more, about $20-$60 each, and they're a bit
heavier in your pocket.
I recommend the BelOMO 7x Triplet Loupe Magnifier
found at the
Amateur Geologist Shop. It cost about $25, which is a pretty
good buy.
The Edmund Optics Hastings Triplets from
Edmunds
are also good, but more expensive (search their site for "Hastings
Triplet"). The 7X ($46) is good for all-around viewing. The
10X ($47) is good for smaller crystals, but I find my 10X doesn't get
much use. |
 The picture at right shows you the size of an average-sized snowflake.
You can test your magnifier in the comfort of your living room by having
a look at a shiny new penny. If you can see Honest Abe sitting
in the Lincoln Memorial (on the back of a penny), then your
magnifier is good enough.
The picture at right shows you the size of an average-sized snowflake.
You can test your magnifier in the comfort of your living room by having
a look at a shiny new penny. If you can see Honest Abe sitting
in the Lincoln Memorial (on the back of a penny), then your
magnifier is good enough. Once
you're out in a gentle snowfall, simply let some snowflakes fall on your sleeve and have a
look. But remember - not all snowfalls bring gorgeous snow
crystals. If you don't see much interesting after 5 minutes, then
you might as well stop looking. Try again another day. If
you take a quick look whenever it snows, before long you will be
spotting all kinds of stellar plates and dendrites, columns and needles,
capped columns, and 12-branched snowflakes. |
|
|
Microscopes - A Buyer's Guide |
 Magnifiers are an excellent way to start, but looking
at snow crystals under a microscope can be positively thrilling!
(That's one man's opinion, anyway.) If you already enjoy watching
snowflakes with a magnifier, and you want to see more detail, then I
recommend taking the plunge and buying a microscope. It isn't real
cheap, but a microscope will give you many years of snowflake-viewing
pleasure. You'll remember the beautiful crystals you've seen
long after you've forgotten the price.
Magnifiers are an excellent way to start, but looking
at snow crystals under a microscope can be positively thrilling!
(That's one man's opinion, anyway.) If you already enjoy watching
snowflakes with a magnifier, and you want to see more detail, then I
recommend taking the plunge and buying a microscope. It isn't real
cheap, but a microscope will give you many years of snowflake-viewing
pleasure. You'll remember the beautiful crystals you've seen
long after you've forgotten the price.
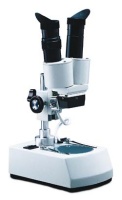
I've done some shopping for inexpensive snowflake microscopes, and I
recommend two in particular -- the Model 400TBL (pictured at right) or
the Model 405TBL from
National Optical, both with a 4X objective and 15X eyepieces
(400TBL-15-4 or 405TBL-15-4). These two models are essentially the
same microscope, except the 405TBL has inclined eyepieces and is a bit
more expensive. Both give a field-of-view of about 3mm, which is
good for snowflake watching.
You can purchase the 405 from
Microscope World for about $175. I own one of these
microscopes, and the image quality is quite good. I believe you
will not find a suitable snowflake microscope for a lower price.
(There are cheaper microscopes out there, but they often have truly
awful optical quality.)
Note that the 400TBL and 405TBL have illuminated bases,
and I've found they work well for snowflake watching. One thing,
however -- you cannot set glass slides containing snowflakes directly on
the illuminated base, since the heat will melt your snowflakes quickly.
You need to make a simple paper platform to hold the crystals.
(More details on this will be coming by 10/2006).
Using your Microscope
I've found two
good ways to look at snowflakes under a microscope. If the
crystals are large, then use a piece of cardboard as a collection board.
Blue "foam-core" -- a styrofoam core between cardboard layers, available
at art supply or office supply stores -- works especially well.
Let snowflakes fall on your collection board while you
look around for nice crystals. When you see one you like, use a
small artist's brush to pick up the crystal and move it to a glass
microscope slide. Sometimes you have to twirl the brush and roll
it under a crystal to pick it up. When the crystal is on the
slide, push down on it gently with the brush so it lies flat on the
glass. Then put the slide under the microscope and have a look.
If the snow crystals are
too small to pick up easily, then let the crystals fall directly onto
some glass microscope slides. Support them by their edges so the
bottom surfaces don't get covered with glop. When a slide has a
nice dusting of snow, put it under the microscope and scan around for
nice crystals. You can see some very interesting small snow
crystals this way. When you've seen what one slide has to offer,
clean it off and try again.
Important operating
tip: Before bringing your microscope in from the cold, put it
inside a large zip-lock bag. That will keep moisture from
condensing on all the optics.
For some tips on how to photograph snowflakes, see Photographing
Snow.
To capture snow
crystals in plastic, so you can view them later in the comfort of
your living room, see
Snowflake Fossils.
|
|

